Loading


Add to Google

Sunday, December 26, 2010

Can a Windows 8 task manager help you upgrade your computer?

Windows 8 task manager can be considered as one of the revamped aspect of Microsoft’s latest desktop operating system. The new task manager echoes the design simplicity that Microsoft has earlier showed with the new copy file dialog box. It helps the users to close their every day processes and applications just in one click. The new development in the technology will help you optimize your CPU easily. According to Microsoft, the development of this new task manager will be equally appealing to the tech and the non-tech users as it consists of the same good features and includes some that should have been implemented since XP.
Usage of end task button:

In windows 8 when you’ll open the task manager you’ll find a redesigned window that will display only opened applications and two buttons, more details and end task. You can close each of the applications with the help of the end task button. Hence, the visual style has made a replacement to the chaotic option given in windows 7 that can only help the advanced users. Now you don’t have to wander through a multitude of buttons and can easily use the task manager in windows 8. Though the ‘end task’ button helps you to kill the process and shuts down your program in no time it won’t warn you to save your work before you shut something down.

Usage of more details button:

With the help of the ‘more details’ button you’ll be able to switch to the Advanced task manager’s panel where you’ll find a screen almost same as windows 7. Here, the applications that were earlier seen above will be displayed at the top of the screen. If you’re a power user, then with the help of the more details button you can get the information about what is going on in your system. This will open up a more familiar screen where you’ll find all the processes are grouped under different categories such as all background processes, all operating processes and many more. If you click on the left corner of each application, the list will expand and it will drill deeper into what your computer is currently running. This will help you find out how many outlook windows are opened or how many processes are being run in the background by the specific service.

At the right side of the top of the screen Microsoft highlights the percentage of the usage of CPU, memory, disk and the network usage. It also provides you with a heat map with the help of which, you’ll be able to identify which applications are sucking up your system resources. As the names of the processes are appearing in plain language instead of cryptic terms, it has become much friendlier to the users. With these improvements, Microsoft has made the task manager much more simplified to the users who don’t have a high level of detail. Hence, holding the hands of Microsoft, technology has gained advancement to a greater extent. 

Thursday, December 16, 2010

Computer 101: Installing a Printer on your Computer


Why? Well does everyone know how to install a basic printer? But there is the printer manual on how to install one. Every new printer that is bought off the shelf comes with one manual. Yes that true but does everyone really read those manual or do take time to understand them. To most of user installing a printer on their own is simply hard to do. If something's go wrong during the installation process they easily give up and ask a tech supp guy to do it for them with payment of course.


Most printers' installation is the same and they use the same cable connection with the computer Universal Serial Bus cable. Let's do a quick checklist on what we need to install a newly bought regular printer. The printer itself, CD driver, USB cable and the power cable. All of them must be present to be able to install the printer on to the computer. Most common mistake by people installing their printer is plugging the printer first to the computer then waiting for it to install itself. This will only work if your computer's operating system is regularly updated on all its driver and software front. Also even if you successfully installed the driver of today printer most of its monitoring software will not be included. This monitoring software is also important in the day to day operation of the printer.


When you're going to check for the ink level of your printer this additional software. Another function of this software it the maintenance side of it. Which we will not go into details here. To get started first put the CD or DVD driver into your CD/DVD ROM drive and let the auto play or if the auto play ask to allow it to run then go ahead and click the okay button. Then after clicking the button wait for it to display the welcome screen or the menu asking you to choose what kinds of installation would you like. Now to make this simple if you see an option to install all items then go ahead and check the box beside it or check all the box besides all the item listed including the driver. This make take a little longer to install but at least will you can be sure that all features of your printer are taken care of. Now click the next button to continue. Wait for the installation program to ask for you to connect your printer.

When the program ask you to connect your printer make sure that you connect the printer properly on the USB port of your computer and turn it on and wait for the program to detect your printer and to continue installing it and the rest of the software package that goes with it. Remember to wait for it finishes the installation routine. A screen will display that the installation is done and you will know it. 

Monday, December 13, 2010

Computer 101: Parts that Affects the Over-All Computer System Performance. Part-2


Another part that directly affects the over-all performance of the computer is the amount of memory installed in relation with the software requirement of the user. For most standard computer the minimum amount installed should be 2 Gigabytes but this is only for standard user. This amount of memory my vary depending on the software requirements of the user. For any professional user that uses software intensive application then it should be more than 4 gigabytes. Another type or requirements is for the gaming industry. Games that needs vast amount of memory should have more memory preferred for it. The more memory there is available for the software the better. Remember the Operating system like MS Windows or MAC OS first and foremost is the first who uses this memory to function properly.


Each of this Operating System software requires each minimum memory requirements to function properly. All software requires being loaded into the memory to before being able to function normally. To verify the amount of memory installed into your computer, use the DXDIAGNOSTIC Tool or just check the system information of your computer via the control panel or by accessing the properties of the my computer and viewing the system information.


Another parts that contribute to the overall performance of the computer is the bus speed of the motherboard and the seek time of the hard disk. For the seek time I have already mentioned this on the older post on this blog. For the system bus it is where the data travel from one component to another during the processing of information. It all starts from the input to the processing to the output. The bus is like a road or system of road wherein the data is the put into a carrying signal that acts like a vehicle the data is the person going from one place to another. In order for them to reach its intended destination they must use the road or system bus. Wider system bus or more data it can handle in a given cycle the faster the information is process the better. Simply put it if a slow bus rate is use to transfer huge amount of data for each given time then you have a slow processing function and a slow output even if you have a fast processor, large amount of memory and fast hard drive. The same is true with all the other aspects they must be all fast in order to complement each other for the over-all performance of your computer.

Sunday, December 12, 2010

Computer 101: Parts that Affects the Over-All Computer System Performance. Part-1

Processing speed, Booting speed and over-all performance of your computer. This is always what we wanted from our computer, from desktop to laptop. What ever the model or kind of computer that we have we need speed in it's performance. My processor has 2 or 3 GHz of computing power but still it seems slow to react to all my task. Well yup your processor is fast, but it just one of the many factor that affect the over-all speed performance of the computer. But they say that if you have a very fast processor then it good enough to make your computer fast also in processing. Partly true and wrong. That just sales talk, most sale person will talk about a lot of things even magnifying feature that should be standard in every computer. Especially if they know that the person buying does not possesses the technical knowledge to see thru what thy saying. Let's see there are at least four parts of the computer that needs to be attune with one another to really know if your system is fast enough for you. 


First there is the processor, which should be in quad core technology by now. The what? Quad core processor meaning your computer should have at least FOUR processor in it. But how do I determine if my processor has four processor in it, inst that technology suppose to be for super computer? Well yes it's true back then and more than four is needed for super computer. Do not bother with dual core processor, the standard for today's processor is four processor or Quad Processor. Now how do we determined that the computer that I am going to get has four processor. Please see screenshot below.


As you can see from the picture above the illustration of the Quad technology with four processor. Now how did you get there, can I as a regular guy know this. Yes everyone can do this display how many processor there computer has. Now wait a minute here, there is only one processor every time i look inside a new computer, the motherboard contains only one, how come there is four of them there? Yup your correct there is only one  package inside every computer. It's like this everybody knows that the normal is there is one  main building big or small right. But inside this main building there are several rooms, especially the really big one. The same is also true for all new quad core processor. There is only one package but inside this package there can be four processor inside instead of the regular one. Now designer and engineer's where able to implement that design it all started with the dual core processor. They say two is better than one, but four or more is much much better. Now that quad processor is becoming or is already a standard in computing then you need to know how to verify it. To display the screen-shot above just follow this simple step.

Windows 7 Control Panel
Click the start button and find and click on the control panel menu. Then the screen-shot above will appear. On the control panel please select the system and security sub-menu highlighted above. Then the screen-shot below will appear.


From the screen shot below please click on the Device Manager Link and the Device Manager that contain all the hardware information on your computer will appear just like on the screen shoot below.


On the device manager just click on the processor tree to display how many processor is there on your computer. It will show just how many there are. Just like on the first screen shot. More on my next post.


Friday, December 10, 2010

Computer 101: The System Information Tool Part 1.


Another tool that will also be able to help you understand your computer inner workings is the System Information Tool. But before we proceed i will caution everyone this tool is a bit different from the DXDIAGNOSTIC TOOL. Well for one this tool is more detailed compare to the other one and there is a whole lot more information on this. Also a lot of the information contain on this tool is very technical in nature. But do not let these things deter you from knowing your computer, yeah sure this tool is very technical in its presentation but this tool is free and there is NO I repeat NO labelled that said THIS TOOL IS FOR THE PROFESSIONAL ONLY. No wouldn't find any indication that this is for them only. This tool is for everybody, for those who is brave enough to know what is there need to know about their computer even if you do not have a technical background or come from the technical or I.T field. Now having said that please take a look at the picture or screenshot below of the System Information Tool.


I welcome you to the S.I.T. no welcome screen or message. It gets right down to the basic of your computer. You may ask why I need to know about this one, the DXDIAGNOSTIC is fine already. Well simple put it knowledge is power and the more you know the better for you. Okay look at those item on the left there the tree menu, notice those boxes with cross on the inside. If you click on them the sub item for each tree branch will appear. On the right frame it the content of its tree branch. In this first content you notice that the information about the computer is the same as that of the information displayed by the DXDIAGNOSTIC tool. Every bit of information is exactly the same, however this one contains more information that the other tool. Just like what I mentioned earlier this tool is more detailed. Examine each item very thoroughly and will know that both tool will display the same information on the same computer. But before we go any further let's back track a bit. First how does one activate this tool? Where is this tool located? Okay first click the start button then go to the accessories menu then from there looks for the System Tools sub-menu. Inside this sub-menu will find the many tools. Look for the System Tool and click on it. As you can see I highlighted the procedure so you will not be lost. Now you have two different tools that you can used to verify what is really inside your computer. They both should contain the same exact processor type, memory amount, manufacturer, Operating System version and a whole lot of other item. But wait this is just the first batch of information you will know. By clicking on the net level of the tree another set of information will be displayed, take a look at the picture below.


The first content of the Hardware resources is the Conflict/Sharing. As you can see the information shown is labelled they the Resources and Device. For the computer to work properly its need resources from the hardware like memory address and Interrupt request. Wait this is getting to technical. The summary of this information is the resources being shared by the hardware part of your computer to make them work as a one unit. . Also the conflict in resources is also shown and marks explicitly, but on this information there is no conflict in the sharing of resources. Everybody needs resources to work, from country, government to small community they need resources to function as whole even though they are not really on but a coming together of several parts working for the common goal. In this case each in every hardware and software of the computer needed each other to function normally. Without the other both of them will not be useful. As a common knowledge the hardware is just a piece of metal without the software and the same is true with the software. The benefit of both cannot be felt without the other. They go together with each other. If you are not comfortable to go on exploring this tool, then take it easy one step at the. Do a little research say on the words that are not familiar to you. Let say the word IRQ which is short for Interrupt Request, the RQ stands for ReQuest. Search for it on the internet they have ton of information regarding this word. Do it one day and one word at a time. 


Enhanced by Zemanta

Tuesday, December 7, 2010

Computer 101: The important of RE-Booting your Computer.

Re-Booting or Re-Starting your computer, how many times have you done that. Well for most heavy user or professional user then, this happens very-very seldom. Why, well for one they have tons of automatic software that run in the computer and for them simply re-booting there computer is not a good idea. The bottom line is they do not like to wait on there computer to re-initialized all those automatic software that they have put into and windows itself has some of them. But it takes simply the user to activate this and scheduled them. Even when they go to sleep they do not shutdown there computer claiming it a waist of time, because they needed there computer to work for them even at night when they themselves have to take a time out and rest there mind and body. Simply waiting for those programs to come online again after a cold hard reboot is an eternity to them. why bother with the re-booting your computer, there no real benefits on this.Well not exactly the benefit of this can be seen as months and years go by, meaning it is more beneficial on the long run. One cannot forever to ignore that his computer needs to re-boot or to restart. Have ever heard of the term "Metal Fatigue" well this is true for some part of your computer, like the hard drive, your power supply unit, also those little chips and I.C. that make up your computer. Another danger is the over-heating of component or over use cycle. Where all you component degrade slightly each every time it is being used continuously.

But before your start re-booting your computer take the time to also save all your  files and close any open program. Re-booting the computer will also allows it to save all those configuration that you have just made on all your software and hardware. Now how do we start to re-boot your computer. Well you just do not press the re-star button on your computer, that will do more harm that it will do good for your computer. to reboot your computer go to the task bar and click it. Then select the shutdown command, for earlier version of windows a confirmation box will appear asking what is your choice, Turn-off, Restart, or Standby. For re-booting purposes click the Restart button and wait for it to complete it task. For shutdown purposes click the Turn-off button. For windows 7 user if you click on the shutdown button the choices is no longer there the computer will automatically turn-off after pressing the shutdown button so be very careful to save all those files and close all open programs that your using to really maintain you computer.


They will argue my computer is always in the air-conditioned room 24/7 and minimal dust gets in.Well if your using Windows OS then re-booting is a natural part of your computer life. When installing hardware upgrade and/or software. The OS will request a reboot, because it needs to initialized the hardware and the software for its proper configuration, but this is normal re-booting. More important reason to reboot is when a software hangs or just suddenly freeze in the  middle of your session and there is no other way for you but to re-boot to clear all cache and close the problematic software. Another thing is one needs to rest the computer so that it can heal itself and free the memory of all those cache items that needs to be removed. Simply re-booting your computer will help it run better in the long run.


Enhanced by Zemanta

Sunday, December 5, 2010

Computer 101: Using the DXDiag tool to know more about your Computer


Have you ever heard of the DXDIAG? Do you know what it's look like and where it is located or how to activate this free software? This free software is one of the most ignored software or unknown software tool in windows system. If your ask an a person regarding this tool, chances are you'll get a mixed reactions in there faces. In the first place why is it there if no one ever used it or cared to know more about this free tool. Well for one the content of this tool can be pretty intimidating to most user who does not have enough technical background. First how do we activate this tool to know what inside our computer. To activate this tool please see picture below.


To activate the DXDIAG tool press the start button then on the search bar type the word dxdiag and hit the enter key. The picture below will appear, but if it is your first time to activate this tool a question will appear first to ask you whether to allow dxdiag to check for digitally sign driver. Just press the YES button to continue loading the DXDIAG tool which should look like the picture below.

DXDIAG Tool
Notice there are several tab to this tool, they are the system, display, sound and input tab. Clicking on each tab will display there content. The first tab is contains the most common information about your current computer system, the hardware and the software. As you can see from the picture above the computer name, operating system, language, system manufacturer, system model, BIOS, processor, memory page file and the direct X version are all listed here. You may ask, So  what I'm i going to used this for. Well this figure and data may not be useful to an average person but to a technical support person, this is valuable information. This first tab indicate how many memory are installed into your system, what type of processor is there and most of all the computer model is indicated. Which should be useful for warranty information if you system is new and what to verify it's content of the manufacturer's websites or on the vendor's website. This tool can help you verify if the vendor is telling the truth regarding the machine he or she is selling. Remember to access the tool just go to the start button and on the search bar type the word DXDIAG and press the enter key to activate the free software tool. 


Enhanced by Zemanta

Saturday, December 4, 2010

Computer 101: Parts on the Outside Part-2


Now the CPU or the Central Processing Unit or System Unit contains the main inside hardware parts of the computer. Let see there the motherboard, the memory module(s), the CPU chip, the hard drive, DVD RW drive, the Power Supply Unit, the cooling fan and heat sink on top of the CPU. Lets see did i miss anything, well the motherboard contains all the connecting point of all the hardware devices mentioned above. Ah h theres the graphics card or video card, the sound card for high end users and the network or LAN card optional for others.

Inside a typical CPU


Today's motherboard comes with a built-in S/V/L, wait what an S/V/L. It stand for Sound, Video. and LAN. The only thing missing if your purchasing a new motherboard is the CPU and it cooling system and the memory module which is sold separately. But if your purchasing a whole computer set then that not applicable. Okay lets focus on the motherboard that is found inside every computer. The motherboard is where it all connects. The monitor using its cable is plug into the video card port which is connected or built-in the motherboard. The same is true for the mouse and keyboard, they connects via the PS2 or USB port which is usually built-in into the motherboard. The same is true to all external devices that we can connects to the computer, your Web cam, Mic, Speaker system, your smartphone, printer, scanner, external drive and a host of other devices. The most common port used in interconnection for today devices is the USB port. Your supposed to just plug it in and let it connect to your computer.


USB, LAN, PS2, MIC and Speaker port

Okay where suppose to blog about the external parts not the inside parts, but i thought i should give you a sneak preview of my nest post. Back to the external parts. The CPU Case is also important not just for appearance but also for the cooling system it can provide to your CPU unit. You should know where are those FAN located so would not be able to block them when placing your computer on tight spot. Also it should be strong enough to handle the daily grind that it would experience. The air should be able to get in and out of your CPU Case with the aid of those cooling fan properly positioned in your case design. The CPU is where all the work is done, the input, processing and output is done all in there. Make sure to also check on your CPU regularly so that dust build up and other stuff like small insects should not make your CPU there permanent abode. It should be check regularly, lets say weekly to maintain it in top form.

Enhanced by Zemanta

Thursday, December 2, 2010

Computer 101: Parts on the Outside Part-1

Hello I hope your day is going fine, hope your in good health. Okay we will start on a blog series that will tackle on the computer hardware parts on the outside and on the inside. a lot of people who uses computer for almost everything don't have the time to know what's on the outside and what is on the inside of this very important machine.First of all i assume everyone knows what a computer look's like. Lately it has taken on a lot of very different shape and sizes and function but on this series of blog we will focus on the Desktop Computer, the first computer which was tailored made for offices, leisure spot, activity center and many more and of course your own home sweet home. Still remember your first computer, what was the specification of that? how big is the Monitor. What was the speed of the processor, how large was the hard drive and the memory. What was the color. How did you feel when your parents bought you your first computer. I'm sure you have a lot of memories regarding that time.


To start with the computer is made up several key component during it early years. They are the Monitor, Central Processing Unit, the keyboard, the mouse (pointing device) and also we have the printer. This was the basic parts ohhh I almost forgot, the speaker and microphone. The Monitor is your basic output devices, this is where we see what we are doing. The monitor is our windows to the uses and function of the computer. From CRT technology to thin LCD upto LED and HD technology monitor of today.The main basic difference of the monitor today than its ancestor is the size, another is the power consumption. Your old CRT monitor eats a lot of power when in use. But todays, LCD and LED screen eats smaller electricity even on if left open for a long time. Another big savings for the LCD/LED screen is the space the old CRT uses. Just imagine a 19" inch Desktop CRT of even bigger and compare it to the space needed for the LCD/LED screen.


Keyboard

Numeric Keypad


Now let's go to the keyboard, there not much difference from the keyboard of the old days to the keyboard of today.It's basically the same design from the old model up to the new and latest model. There may be a few enhancement here and there, soft keys, hand rest to name a few enhancement. But still it is the same keyboard even if the wireless model and folding keyboard. The keyboard is the main input devices that is attached to the computer. It's like a type writer without the loud sounds. This is what we used to type documents and fill-out electronic forms online. This is also were we controlled our computer if it hangs, we pressed three keys to restart it. To access CMOS setup content and menu we press certain during the boot-up process. If your want to view process on your computer under windows we press certain key combination. For editing of document we also access the keyboard, especially for the people who uses the shortcut method of accessing all the function of the word processing software. The most ordinary keyboard will not function properly if water or liquid is poured into it. Buy some high-end type have built in protection for this kind of substance if accidentally spill into it.


Mouse with a lighted Scroll Wheel


Next is the Mouse or you pointing device. Just like the keyboard the mouse has changed little ever since it was introduced in it's early days. From mouse with balls used for arrow movement to the infrared and scroll mouse of today. Basically it's the same design even the wireless one. There are also other type of pointing device used in computer, the track ball which has the ball on the upside not under. all mouse are still susceptible to the wear and there of the parts inside it just like the keyboard. If a key is used more often than the other chances are that key will be the first to be depressed.

Infrared Mouse tracker


The nest item is the CPU or the Central Processing Unit, or the System Unit. It's be called by a lot of names. But we been referring to the same thing when it come to the computer. Well its better to talk about it on my next post. I'll be adding a couple of picture here as soon as i can.


Enhanced by Zemanta

Wednesday, December 1, 2010

Computer 101: Self Back UP for Windows XP and Vista Continued.


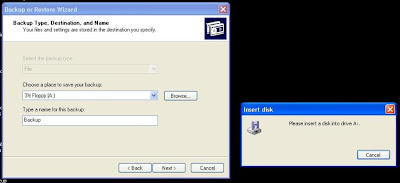
Now to continue on this post for Windows XP and Vista users please see the picture below. Notice we need to select the backup destination by clicking on the CHOOSE A PLACE TO SAVE YOUR BACKUP: IT initially display the drive A which is the default setting. After clicking on i the menu on the side will display since the drive A is not the selected backup destination. If it is not there then click on the BROWSE button. In this picture one can see that the file-name for the backup has already been set and that it cannot be change anymore. 


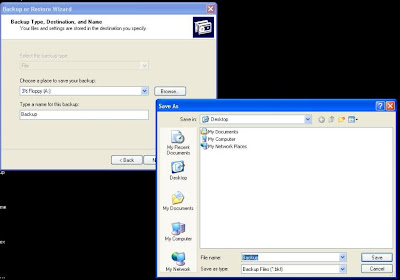
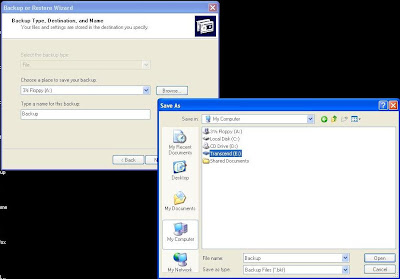
After clicking the Cancel button the following picture will appear. From this picture the location of the backup destination can now be selected. Select my computer to see what devices is available for backup.


Enhanced by Zemanta

Computer 101: Self Back UP for Windows 7 Continued.


It's a good day today for me why, because i am well again although not yet totally but going there. Ive been sick for a whole week. I have not been able to do a lot of things when sick. One of those things is to post the last part of this blog. Now that I'm on my why to recovering my good health status i will be able to do this post. To begin with, in Windows 7 and in previous version of Windows, there is a difference on the back-up process when you get to the actual processing where in you see the process bar actually creating the back-up file for all you files. Now how would it look like. Before we go that look at the picture below. I highlighted  that the back-up destination must be selected in order for the for the next button to be enable. I the NEXT button is not click able after selecting the back-up destination then you should choose to select or supply other back up type for a new destination.


Now press the next button to go to the next step which should look like the picture below for Windows 7 user.In this picture you one will be asked to select a choice of whose going to do the selecting of files for the back-up. Again this brings us back to the earlier post that said prepare your all your files first organize them so that it will be easier locating them if there are all in a single location. In the picture below one have two choices that's either let the system choose the file to back-up or let the user do the selecting. If you are not sure if all your files can be located in a single folder, then choose the first option which is to let the system do file selection process. Okay let say you choose the first option then press the next button to go to the next part.


Notice that the picture below tell us, this is your backup setting, review it first before starting the actual back-up process. Yup folks make sure all your setting is correct. That means the destination folder and the items to be back-up are all there. If all things are in there proper places then just press the button labeled SAVE SETTING and RUN BACKUP to begin the process.


Now after pressing that button the picture below will appear. The picture below will appear, yup the backup process windows and as one can see the backup process has started. Now on this part the time it take to backup the selected items will overall determined the time duration for the backup to be completed. If you have a very very large amount of files to backup and this is your first time to do it then do something else while you wait because it would take quite some time to finish the process. As you can see the green bar is still on the beginning stage as one observe the process it will get longer and longer until it fill the entire space alloted to it. In this stage just sit back and relax or do other things while we wait for the process to finish.


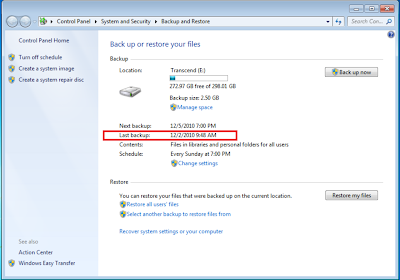
Now lets say that the backup process is finish, then the next picture will appear. The backup process bar is gone and if one observe it right, you'll see that the last backup process has been log or recorded as highlighted by the red rectangle. Okay now that the backup process is done, how do one verify if the back-up files is created or all my files were back-up properly. Well the ways to do that, one simple way is to go to your destination folder and check for the back up files.


Now if one is the backup destination then please look at the picture below. There are two highlighted parts on this. First the location folder and second the backup file itself which is represented the icon below highlighted by the red rectangle. To verify if this is the backup files, the just double click the icon and it will activate to ask three questioned. But if your satisfied that this is the correct one, then your done. you have correctly completed your first back-up process. I quick note this is for Windows 7 user the actual process for the older version of windows will on my next post. Hopefully that tomorrow or the next day.


Here Are Some of My Most Popular Posts Since Day One.

If you like my blog Please Subscribes to my RSS Feed for updates and more

Rydertech

↑ Grab this Headline Animator


Subscribe via email

Enter your email address:

Delivered by FeedBurner
Your Email Will never be shared or Made Public

Related Posts Plugin for WordPress, Blogger...